
Preparation Checklist for Installing ResponseMaster
Before you install ResponseMaster ensure that
- Your operating system is Windows11 or Windows Server 2024 & 2019.
- You can log on as a Windows administrator.
- You know the mail server user name and password.
- You have downloaded Java.
- You have have a ResponseMaster License Key
- You have reviewed the ResponseMaster readme file.
Uninstall all existing version of java prior to installing a version. If you have issues uninstalling older version of Java please read the following like for assistance click here.
High Level Steps
Execute all of these steps as a Windows administrator.
-
Java download and install
- Run add remove programs. Look for existing versions of java. Most likely from Oracle Java and uninstall. Do this even if you are upgrading to a more current release of Oracle Java! Installing a new version of Java on top of existing Java versions will cause issues.
- Download Java from either Oracle or Adoptium. Select one of the version of java for which ResponseMaster was verified. This information is included on the release notes. When available, selecting the LTS, MSI, and HotSpot package version of java is best.
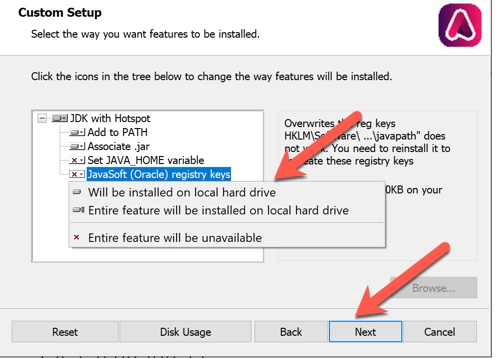
- When installing the MSI make sure you select the install of the JavaSoft (Oracle) registry keys!!
-
ResponseMaster
- Download ResponseMaster
- New Install is for installing ResponseMaster on a computer for the first time. Most will want to download the msi windows installer file.
- Upgrade is for customers who had prior version of ResponseMaster installed on the computer. It is HIGHLY recommend you confirm ResponseMaster is not currently running and you perform a backup of the ResponseMaster directory before you start the install.
- Double click the ResponseMaster file which will start the windows installer. Follow all the prompts.
- If this is a ResponseMaster upgrade, skip to step 6 Verify ResponseMaster Install.
- Download ResponseMaster
-
ResponseMaster Configuration Tool
- Install Windows systems for the ResponseMaster configuration tool.
- Navigate to the C:\Program Files\ExtremeMessaging\ResponseMaster\depends\VBRuntime
- Double click setup. Accept all the defaults during the install. (Don’t be alarmed… This is an old windows installer and it looks very old)
- Install Windows systems for the ResponseMaster configuration tool.
-
License Key
- Install ResponseMaster License Key.
- Navigate to C:\Program Files\Extreme Messaging\ResponseMaster\config and place the License.xml file in this directory.
- Install ResponseMaster License Key.
-
Verify ResponseMaster Install
- Open the Windows System Service manager. Navigate to the service named ResponseMaster. Start the service.
- Navigate to C:\Program Files\Extreme Messaging\ResponseMaster\output and open the log.txt file. Search for the words “Logger initialized”. This is the first line in the log file generated by ResponseMaster when it starts.
- The next line is ResponseMaster Build ###. ### should match the version of ResponseMaster you just installed. If not search log file until you locate it.
- Now look for errors. Scroll down through the file looking for errors. If you encounter errors you can search the FAQs for answers or contact Customer support for assistance.
-
Configure ResponseMaster
- For new installations now you will need to configure ResponseMaster to process your returned and bounced emails. Refer to the ResponseMaster Configuration Guide for details.
Adapting the installation for your environment
- To change the classpath:
- Double-click EditServiceParameters.bat
- Change the “imagepath” setting to include whatever additional paths you need
Note: If you are using the JMX monitoring features, you will need to include jmxri.jar and jmxtools.jar in your classpath. If these jars are not included in your java distribution then are part of the JMX package, available at http://java.sun.com/products/JavaManagement/.
- To set system properties on the JVM:
- Double-click EditServiceParameters.bat
- Go to the Java VM tab
- Put something like “-Dmyprop=myval” in the Java Options box
Note: most JVMs have a very low default max heap size, so you may want to adjust it using an option like this (for 750MB): -Xmx750M
- To run ResponseMaster from the command line instead of as a service
- Go to Administrative Tools->Services and disable the ResponseMaster service
- Use a command line like this from the installation directory: java -jar responseMaster.jar ./config/master.xml
